
This cast iron skillet pizza features a thick, chewy crust with caramelized edges and bubbly cheese. It is a quick meal that requires no pizza stone and can be completed in about 30 minutes.
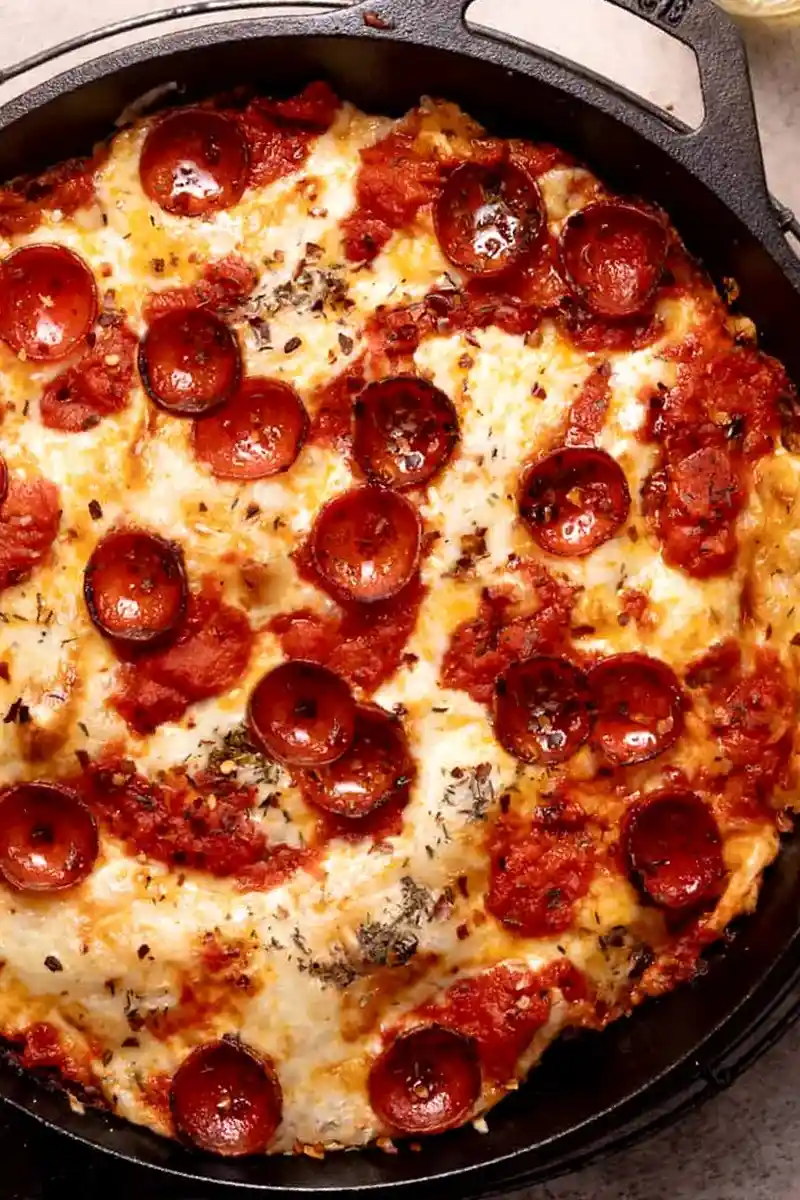
List of ingredients
- 1 tablespoon olive oil – used to grease the pan and fry the crust.
- 12 ounces pizza dough (store bought or homemade) – ensure it is at room temperature for easier stretching.
- 2 cups shredded mozzarella cheese – use low moisture block mozzarella for a crispier result.
- 1/2 cup pizza sauce (store bought or homemade) – applied over the cheese to prevent sogginess.
- desired pizza toppings – keep quantities moderate to avoid weighing down the dough.
step-by-step instructions
- Prepare the oven: Move one oven rack to the very bottom and one to the top of your oven, then preheat to 450°F/230°C.
- Prep the pan: Evenly spread the olive oil across the bottom and sides of the cast iron pan.
- Stretch the dough: Gently stretch the pizza dough to fill the bottom of the pan, dimpling the surface with your fingers.
- Layer the cheese: Sprinkle the mozzarella cheese over the entire top of the dough, extending it all the way to the edges.
- Apply the sauce: Dot the pizza sauce over the cheese, ensuring it reaches the edges of the pan.
- Add toppings and bake: Place your favorite toppings on top and bake on the bottom rack for 18-20 minutes until the crust is golden brown and cheese is melted.
- Check crust and brown top: Lift a side with a spatula to check browning; if the top needs more color, move the pan to the top rack for 2-3 minutes.
- Release and serve: Place the hot pan on a wire rack, run a sharp knife around the edges to loosen the crust, and transfer the pizza to a cutting board.
Optimizing Your Baking Equipment
Use a Seasoned 12-Inch Cast Iron Skillet
A 12-inch skillet provides the ideal surface area for 12 ounces of dough. Cast iron is essential because it retains high heat, which fries the bottom of the crust in the oil for a deep golden color. Ensure your pan is well-seasoned to prevent the dough from sticking to the sides.
Alternative Metal Pan Options
If you do not own cast iron, a heavy-duty metal baking pan can be used. While it will not achieve the same level of heat retention or crispiness, it remains a functional substitute. Be sure to use a generous amount of oil to mimic the frying effect of the skillet.
Adjusting for 9-Inch Pans
For a smaller 9-inch pan, reduce the ingredients to 10 ounces of dough, 1 1/2 cups of mozzarella, and 1/3 cup of sauce. Use 2 teaspoons of oil instead of a full tablespoon. The baking time may decrease slightly, so check the bottom of the crust earlier.
Dough Preparation and Handling
Importance of Room Temperature Dough
Cold dough is tight and will shrink back when you try to stretch it into the pan. Allowing the dough to sit at room temperature relaxes the gluten, making it pliable. This ensures the dough reaches the edges of the skillet without tearing or springing back.
Techniques for Stretching the Crust
Avoid using a rolling pin, as this can compress the air bubbles needed for a chewy texture. Instead, use your fingertips to gently press and stretch the dough from the center outward. Dimpling the dough helps distribute the thickness evenly across the pan.
Working with Store-Bought Dough
Store-bought dough often comes in a cold vacuum-sealed bag. Remove it from the packaging at least 30 to 60 minutes before baking. If the dough is too sticky to handle, lightly dust your hands with flour rather than adding too much flour to the dough itself.
Cheese and Sauce Selection
Choosing Low-Moisture Mozzarella
Low-moisture mozzarella is superior to fresh mozzarella for this specific method. Fresh mozzarella contains high water content, which can release during baking and make the crust soggy. Block mozzarella that you shred yourself also melts more evenly as it lacks anti-clumping agents found in pre-shredded bags.
The Logic of Sauce-Over-Cheese Layering
Placing the sauce on top of the cheese creates a protective barrier for the dough. This prevents the moisture from the sauce from soaking directly into the crust. This technique is the key to achieving a crispy bottom while maintaining a gooey cheese layer.
Controlling Sauce Quantity
Using too much sauce can lead to a heavy pizza that struggles to cook through in the center. Stick to the recommended 1/2 cup for a 12-inch pizza. Dotting the sauce rather than spreading a thick layer allows the cheese to peek through and caramelize.
Topping Strategies
Selecting Moisture-Rich Toppings
If using vegetables like mushrooms or bell peppers, sauté them briefly to remove excess water before adding them to the pizza. Raw vegetables release steam during baking, which can create soggy patches on the cheese. This ensures the crust remains crisp throughout the process.
Recommended Beef Topping Combinations
Ground beef or sliced steak pairs well with this thick crust. Ensure the beef is fully cooked and drained of excess fat before adding it to the pizza. Combine ground beef with red onions and green peppers for a hearty, savory profile.
Preventing Topping Overload
Avoid the temptation to pile toppings too high, as the weight can prevent the dough from rising. Excess toppings also trap steam, which prevents the cheese from browning properly. Keep toppings in a thin, single layer for the best results.
Baking and Temperature Control
Utilizing Bottom Rack Positioning
The bottom rack places the cast iron skillet closest to the oven’s heating element. This mimics a pizza stone and ensures the bottom of the crust is fried and crispy. Baking here first guarantees the structural integrity of the thick crust.
Achieving a Browned Top Crust
Because the pizza spends most of its time on the bottom rack, the cheese may not brown as quickly as the bottom. Moving the pan to the top rack for the final 2-3 minutes exposes the cheese to direct upper heat. This creates those desired bubbly, brown spots on the mozzarella.
Managing Air Bubbles During Baking
Large air bubbles may form in the center of the crust as the dough heats up. If these bubbles become too large, they can prevent toppings from cooking evenly. Use a sharp knife or fork to gently poke and release the steam from these bubbles.
Post-Bake Handling and Serving
Using a Wire Cooling Rack
Transferring the hot skillet directly to a countertop can trap steam under the pan. Placing the pan on a wire rack for a few minutes allows air to circulate. This prevents the bottom of the crust from steaming and becoming soft after it leaves the oven.
The Edge-Cutting Technique
To ensure the pizza releases easily, run a sharp knife around the inner perimeter of the pan. This separates the caramelized cheese and crust from the metal sides. This step prevents the pizza from tearing when you lift it out.
Transferring to a Cutting Board
Use a wide spatula to lift the pizza from the pan and place it immediately on a wooden or plastic cutting board. Leaving the pizza in the pan for too long can cause the bottom to soften due to residual heat and moisture. Serve immediately while the cheese is still bubbly.
Storage and Preservation
Refrigerating Leftover Pizza
Store leftover slices in an airtight container or wrap them individually in foil. This prevents the crust from drying out and stops the cheese from absorbing fridge odors. The pizza will stay fresh for up to three to four days in the refrigerator.
Freezing for Long-Term Use
For longer storage, flash-freeze slices on a baking sheet before transferring them to a freezer bag. This prevents the slices from sticking together. Frozen slices can be kept for up to two months without a significant loss in quality.
Reheating Methods
The Oven Reheating Technique
Preheat your oven to 350°F and place slices on a baking sheet. Bake for 5-10 minutes until the cheese is melted and the crust is crisp. This is the best method for maintaining the original texture of the cast iron crust.
Using an Air Fryer for Speed
Place a slice in the air fryer at 350°F for 3-5 minutes. The circulating hot air quickly crisps the bottom and edges of the crust. This is the fastest way to achieve a result close to the original bake.
Avoiding the Microwave
Microwaving pizza often results in a rubbery crust and tough cheese. If a microwave is the only option, place a glass of water inside to provide some moisture. However, this will not restore the crispiness of the cast iron finish.
Troubleshooting Common Issues
Why is the Center of My Pizza Soggy?
A soggy center is usually caused by too many toppings or too much sauce. It can also happen if the dough was not stretched evenly. Ensure you are using the sauce-over-cheese method and keeping toppings minimal in the middle.
Dealing with a Burnt Bottom
If the bottom burns before the cheese melts, your oven may run hot or the pan may be too thin. Try moving the rack up one position or reducing the oven temperature by 25°F. Ensure the oil is spread evenly to prevent hot spots.
Preventing Dough Shrinkage
If the dough shrinks away from the edges, it was likely too cold when you started. Next time, ensure it reaches room temperature. You can also try stretching the dough, letting it rest for 5 minutes, and then stretching it again.
Frequently Asked Questions
Can I use a different type of oil?
You can use any oil with a high smoke point, such as avocado oil or grapeseed oil. Avoid butter, as it can burn at 450°F and leave a bitter taste on the crust.
What if I don’t have mozzarella?
Provolone or Monterey Jack are good substitutes for mozzarella. Ensure the replacement cheese is low-moisture and melts well to maintain the crust’s crispiness.
Can I use gluten-free pizza dough?
Yes, but gluten-free dough behaves differently and does not stretch as easily. Press the dough into the pan with oiled hands and expect a slightly different texture in the crust.
How do I stop the cheese from sliding?
Ensure the dough is stretched flat and the cheese is spread evenly to the edges. If the cheese slides, it may be because the sauce was placed underneath, creating a slippery layer between the dough and cheese.
Print
Crispy Cast Iron Skillet Pizza
- Total Time: 23 minutes
- Yield: 8 slices 1x
- Diet: General
Description
This easy cast iron skillet pizza has a thick, chewy crust with crispy, caramelized edges and bubbly cheese from corner to corner. Make it with homemade or store-bought dough, top with your favorites, and bake it up in just 30 minutes, no pizza stone required!
Ingredients
- 1 tablespoon olive oil
- 12 ounces pizza dough
- 2 cups shredded mozzarella cheese
- 1/2 cup pizza sauce
- desired pizza toppings
Instructions
- Preheat: Move one oven rack to the very bottom and one to the top of your oven, then preheat the oven to 450°F/230°C.
- Prepare Pan: Evenly spread the oil in the bottom and sides of the cast iron pan. Gently stretch the pizza dough to fill the bottom of the pan, dimpling it with your fingers.
- Layer: Sprinkle the mozzarella cheese over the entire top of the dough, all the way to the edges. Then dot the sauce over the cheese, all the way to the edges.
- Bake: Add your favorite toppings, then bake it on the bottom rack for 18-20 minutes, or until the bottom of the crust is golden brown and the cheese is browning and melted. To check the crust browning, lift up the side with a spatula. If needed, continue baking it on the bottom rack until browned. If you desire a more browned top, move the pan to the top rack of the oven for 2-3 minutes.
- Serve: Place the hot pan on a wire rack momentarily, then use a sharp knife to run around the edges of the pan to keep the crust from sticking to the pan. Use a spatula to carefully transfer the pizza to a cutting board to keep the crust from getting soggy. Serve hot and enjoy!
Notes
For a 9″ pan, use 2 tsp oil, 10 oz pizza dough, 1/3 cup sauce, and 1 1/2 cups mozzarella. Use room-temperature dough for even baking. If large bubbles puff up in the middle while baking, poke them with a knife or fork to release the steam.
- Prep Time: 5 minutes
- Cook Time: 18 minutes
- Category: dinner
- Method: Baking
- Cuisine: American
Nutrition
- Serving Size: 1 slice
- Calories: 520 kcal
- Sugar: 19 g
- Sodium: 1343 mg
- Fat: 22 g
- Saturated Fat: 10 g
- Unsaturated Fat: 9 g
- Trans Fat: 1 g
- Carbohydrates: 59 g
- Fiber: 2 g
- Protein: 22 g
- Cholesterol: 54 mg