
This comforting dish combines perfectly cooked chicken and tender pasta in a rich, velvety sauce that is sure to satisfy. It is an ideal weeknight dinner solution that brings high-quality, restaurant-style flavors to your table in under thirty minutes. By using pantry staples and simple searing techniques, you can achieve a gourmet result with minimal effort and cleanup.
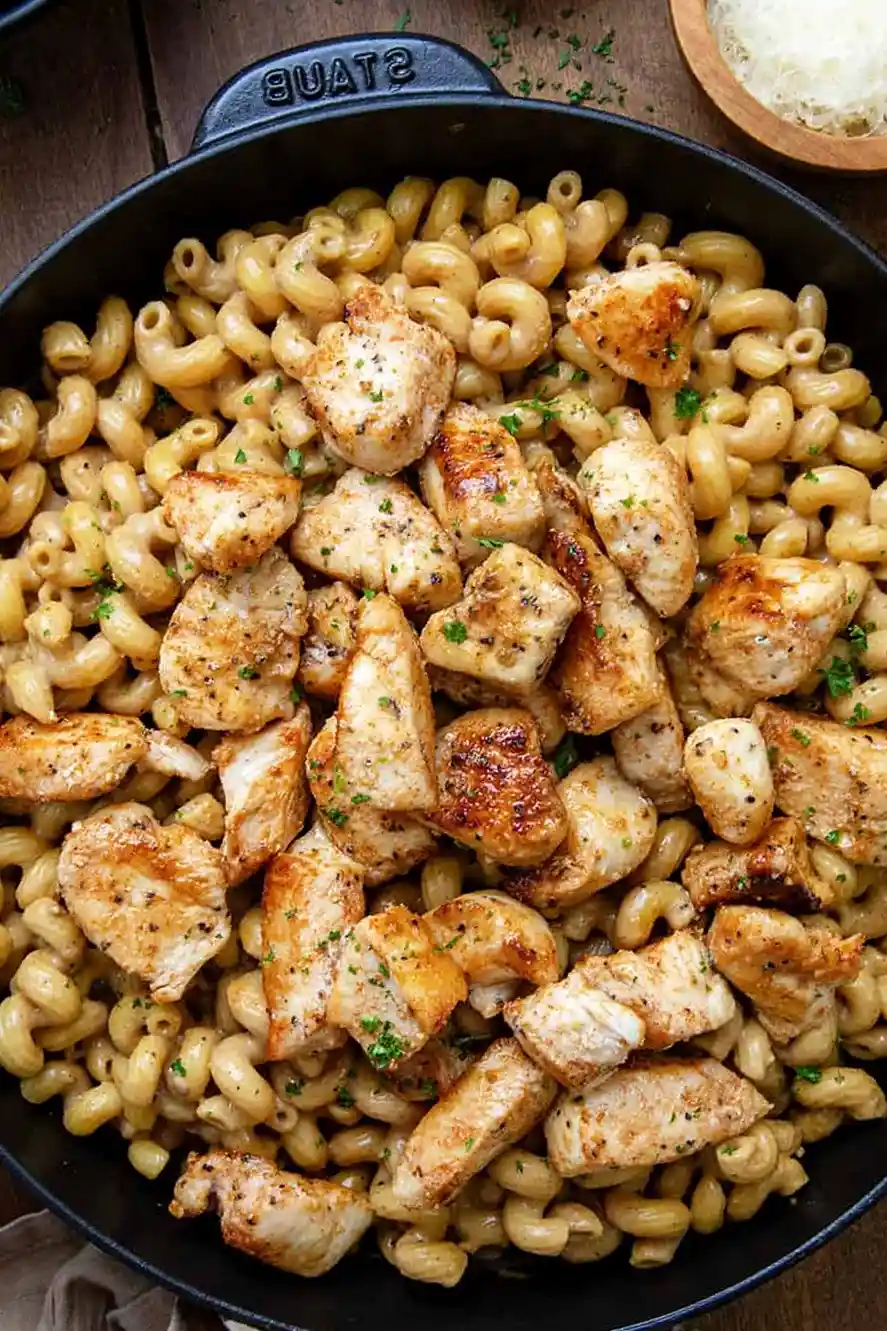
List of ingredients
- 12 ounces cavatappi pasta
- 1 ½ pounds boneless skinless chicken breasts, (cut into 1-inch cubes, pat dry)
- 1 teaspoon kosher salt
- 1 teaspoon garlic powder
- 1 teaspoon onion powder
- ½ teaspoon paprika
- ½ teaspoon black pepper
- 1 tablespoon extra virgin olive oil
- 2 tablespoons unsalted butter, (divided)
- 2 teaspoons garlic, (minced)
- 2 tablespoons all-purpose flour
- 1 ½ cups (12 ounces / 360 g) chicken broth
- ½ cup (119 g) heavy cream
- 1 cup (100 g) freshly grated parmesan cheese, (plus more for garnish)
- salt and pepper, (to taste)
- fresh parsley, (chopped for garnish)
step-by-step instructions
- Step: Bring a large pot of salted water to a boil. Cook cavatappi according to package directions until al dente. Reserve 1 cup of pasta water, then drain and set aside.
- Step: In a small bowl, mix salt, garlic powder, onion powder, paprika, and pepper. Sprinkle the seasoning mixture evenly over the chicken pieces.
- Step: In a large skillet, heat olive oil and 1 tablespoon butter over medium-high heat. Once the butter has melted and the oil is shimmering, add chicken. Sear for 3–4 minutes per side, or until golden brown and cooked through to an internal temperature of 165°F. Transfer to a plate and cover loosely with aluminum foil.
- Step: Reduce heat to medium. To the same skillet, add the remaining butter and garlic and cook for 1 minute.
- Step: Stir in flour and cook for 1 more minute, stirring constantly to form a roux.
- Step: Slowly whisk in chicken broth and heavy cream. Bring to a simmer and let thicken for 3–4 minutes, stirring often.
- Step: Remove from heat. Stir in parmesan cheese and season to taste with salt and pepper.
- Step: Add the cooked pasta to the sauce and stir to coat. If the sauce is too thick, add reserved pasta water 1 tablespoon at a time as needed.
- Step: Top with the cooked chicken and toss to combine.
- Step: Garnish with fresh parsley and more parmesan. Serve hot.
Refining Your Sauce Technique
Understanding The Role Of Starchy Pasta Water
The water used to boil your pasta is a culinary tool that should never be discarded immediately. It contains dissolved starches that act as an emulsifier, allowing your sauce to cling to the pasta rather than sliding off. Always save at least a cup before draining, as even a tablespoon or two can transform a tight sauce into a silky, cohesive coating.
Selecting And Preparing The Best Parmesan
Avoid pre-grated parmesan that is coated in anti-caking agents, as these substances prevent the cheese from melting into a smooth consistency. Investing in a block of high-quality parmesan and grating it yourself ensures that your sauce remains velvety rather than grainy. The flavor depth provided by authentic, freshly grated cheese is significantly superior to store-bought, pre-shredded options.
Mastering The Roux Consistency
When stirring the flour into your butter and garlic, keep the heat at a manageable level to prevent the mixture from burning. The flour needs only one minute of cooking to lose its raw taste, which creates a stable foundation for the sauce. If you notice lumps forming when adding the liquids, switch to a metal whisk and increase your speed to smooth them out immediately.
Customizing Your Pasta Experience
Choosing The Right Pasta Shape
While cavatappi is recommended for its ability to hold sauce, other shapes like rotini, fusilli, or gemelli also feature deep ridges that function similarly. Avoid long, thin strands like spaghetti or linguine if possible, as they do not provide enough surface area for this thick, creamy sauce to adhere effectively. Aim for short, sturdy shapes that offer a satisfying bite and can catch bits of chicken and garlic within their structures.
Incorporating Roasted Vegetable Additions
If you want to add more nutrients, consider roasting vegetables like broccoli florets, asparagus tips, or cherry tomatoes on a separate baking sheet while the chicken cooks. Once the vegetables are tender, toss them into the pasta alongside the chicken during the final assembly step. This method prevents the vegetables from becoming mushy during the stovetop cooking process and keeps their colors bright and appealing.
Adjusting The Creaminess And Richness
If you find the sauce is slightly too rich for your preference, you can substitute a portion of the heavy cream with half-and-half or whole milk. While this will result in a slightly thinner sauce, the presence of the cheese and the roux will still provide an adequate body. Always taste the sauce before serving to determine if an extra dash of black pepper is needed to balance the fat content.
Practical Storage And Preparation
Efficient Meal Preparation Strategies
You can streamline the cooking process by seasoning the chicken in advance and storing it in the refrigerator for up to three hours. Additionally, grating your cheese and mincing your garlic ahead of time will save you significant effort when you are ready to start cooking. Having all your ingredients prepped and organized allows you to focus entirely on the heat management of your skillet during the quick cooking phases.
Handling Leftovers And Reheating
Store any leftover pasta in a sealed container in the refrigerator to keep it moist for up to three days. When reheating, the sauce may thicken significantly because the pasta continues to absorb moisture; add a splash of water, milk, or broth to the pan before warming it over low heat. Constant, gentle stirring is essential to prevent the sauce from separating or sticking to the bottom of the cookware.
Freezing Recommendations For Future Meals
If you intend to freeze this dish, it is best to freeze the chicken and the sauce mixture together, leaving the pasta out of the process. Pasta often loses its texture when frozen and thawed, so it is highly recommended to cook a fresh batch of noodles when you are ready to serve the meal. Simply thaw the sauce in the refrigerator overnight and simmer it on the stove before tossing it with your freshly boiled pasta.
Common Kitchen Questions
Why does my sauce have a grainy texture?
A grainy sauce is typically caused by using pre-shredded cheese that contains stabilizers, which prevent it from melting uniformly. To avoid this, always grate your own parmesan from a block. Additionally, ensure you are removing the skillet from the heat before adding the cheese to prevent the dairy from seizing due to excessive temperature.
Can I use rotisserie chicken for this recipe?
Yes, pre-cooked chicken is an excellent time-saver for this meal. Simply skip the searing step and stir the chopped, pre-cooked chicken into the sauce after the sauce has thickened and the cheese has melted. Ensure the chicken is warmed through by leaving it in the warm sauce for two to three minutes before serving.
What is the benefit of searing chicken in two batches?
If you crowd the skillet with too many chicken pieces at once, the temperature of the pan drops rapidly, causing the meat to release its juices rather than browning. Searing in smaller batches ensures the chicken browns correctly, which builds a flavor base in the skillet that contributes significantly to the overall taste of the creamy sauce. Maintain space between the pieces to achieve the desired golden crust.
How can I tell if the sauce is thick enough?
The sauce is ready when it coats the back of a metal spoon smoothly without sliding off immediately. Keep in mind that as the sauce cools, it will continue to thicken slightly. If it reaches a consistency similar to heavy cream, it is perfectly prepared for incorporating the pasta and ensuring every piece is coated effectively.
Print
Creamy Garlic Parmesan Chicken Pasta
- Total Time: PT30M
- Yield: 4 servings 1x
- Diet: Nut-free
Description
Indulge in Creamy Garlic Parmesan Chicken Pasta. Easy, cozy, and perfect for busy weeknights, this dish is a must-try.
Ingredients
- 12 ounces cavatappi pasta
- 1 ½ pounds boneless skinless chicken breasts, (cut into 1-inch cubes, pat dry)
- 1 teaspoon kosher salt
- 1 teaspoon garlic powder
- 1 teaspoon onion powder
- ½ teaspoon paprika
- ½ teaspoon black pepper
- 1 tablespoon extra virgin olive oil
- 2 tablespoons unsalted butter, (divided)
- 2 teaspoons garlic, (minced)
- 2 tablespoons all-purpose flour
- 1 ½ cups (12 ounces / 360 g) chicken broth
- ½ cup (119 g) heavy cream
- 1 cup (100 g) freshly grated parmesan cheese, (plus more for garnish)
- salt and pepper, (to taste)
- fresh parsley, (chopped for garnish)
Instructions
- Step: Bring a large pot of salted water to a boil. Cook cavatappi according to package directions until al dente. Reserve 1 cup of pasta water, then drain and set aside.
- Step: In a small bowl, mix salt, garlic powder, onion powder, paprika, and pepper. Sprinkle the seasoning mixture evenly over the chicken pieces.
- Step: In a large skillet, heat olive oil and 1 tablespoon butter over medium-high heat. Once the butter has melted and the oil is shimmering, add chicken. Sear for 3–4 minutes per side, or until golden brown and cooked through to an internal temperature of 165°F. Transfer to a plate and cover loosely with aluminum foil.
- Step: Reduce heat to medium. To the same skillet, add the remaining butter and garlic and cook for 1 minute.
- Step: Stir in flour and cook for 1 more minute, stirring constantly to form a roux.
- Step: Slowly whisk in chicken broth and heavy cream. Bring to a simmer and let thicken for 3–4 minutes, stirring often.
- Step: Remove from heat. Stir in parmesan cheese and season to taste with salt and pepper.
- Step: Add the cooked pasta to the sauce and stir to coat. If the sauce is too thick, add reserved pasta water 1 tablespoon at a time as needed.
- Step: Top with the cooked chicken and toss to combine.
- Step: Garnish with fresh parsley and more parmesan. Serve hot.
Notes
Ensure chicken is cooked to 165°F internally. For best results, use freshly grated Parmesan cheese rather than pre-shredded to ensure a smooth, creamy sauce. You can substitute chicken thighs if preferred.
- Prep Time: PT10M
- Cook Time: PT20M
- Category: Main Course
- Method: Stovetop
- Cuisine: Italian-American
Nutrition
- Serving Size: 1 portion
- Calories: 605 kcal
- Sugar: 3 g
- Sodium: 850 mg
- Fat: 28 g
- Saturated Fat: 12 g
- Unsaturated Fat: 14 g
- Trans Fat: 0 g
- Carbohydrates: 52 g
- Fiber: 3 g
- Protein: 41 g
- Cholesterol: 145 mg