
This creamy white chicken chili is a hearty and rich meal prepared efficiently using a pressure cooker. It combines tender shredded chicken, white beans, and mild green chiles for a balanced and comforting flavor profile.
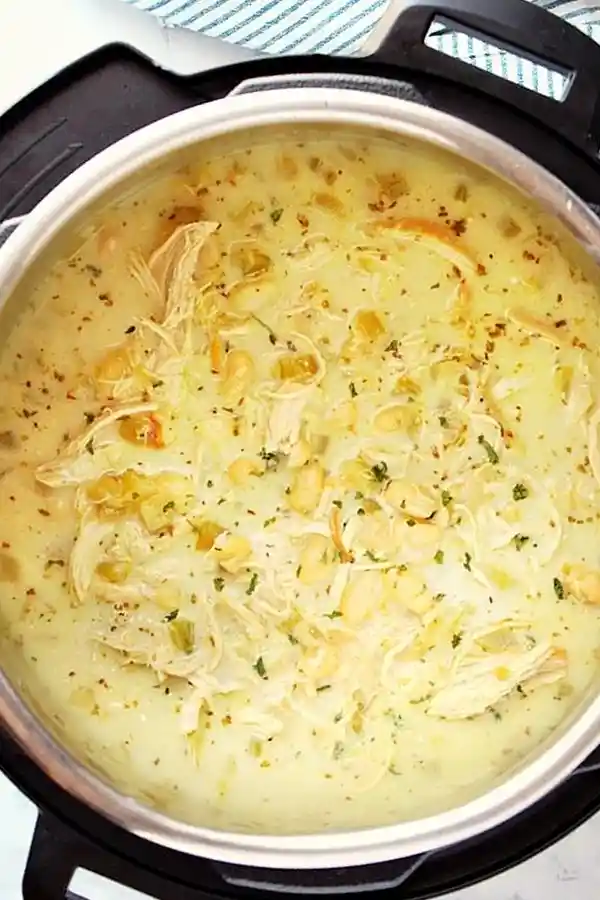
List of ingredients
- 1 cup dried great Northern beans (or 2 cups canned beans, rinsed) – provides the hearty base.
- 1 tablespoon olive oil – used for searing the chicken.
- 2 tablespoon unsalted butter (divided) – adds richness to the aromatics.
- 1 ½ lbs chicken breast or thighs – the main protein source.
- 1 teaspoon salt – for initial seasoning.
- ½ teaspoon black pepper – for basic seasoning.
- 3 garlic cloves (minced) – adds aromatic depth.
- 1 small yellow onion – finely chopped for flavor.
- 2 celery stalks (chopped) – adds texture and earthy notes.
- 2 teaspoons ground cumin – provides a warm, smoky flavor.
- ½ teaspoon dried oregano – adds herbal notes.
- ½ teaspoon ground coriander – adds a citrusy undertone.
- 2 cups water – divided for deglazing and cooking.
- 2 cups low-sodium chicken stock – enhances the savory base.
- 2 cans green chiles (4 ounces each) – adds mild heat and tang.
- 1 cup half and half – creates the creamy texture.
- 1 tablespoon cornstarch – used as a thickening agent.
- 1 cup whole kernel corn (optional) – adds sweetness and color.
- ½ teaspoon salt – for final seasoning.
- ¼ teaspoon black pepper – for final seasoning.
step-by-step instructions
- Prepare dried beans: If using dried beans, place them in the Instant Pot with 5 cups of water, 1 teaspoon of salt, and 1 tablespoon of apple cider vinegar. Seal the lid, set to “manual” or “pressure cook” on high for 35 minutes (or 25 minutes if soaked overnight). Let the pressure release naturally, then drain the beans in a colander and set them aside.
- Sear the chicken: Set the Instant Pot to “saute” and wait for the “HOT” display. Add 1 tablespoon of olive oil and 1 tablespoon of butter. Season the chicken with salt and pepper, brown both sides until golden, then remove the chicken to a plate.
- Saute aromatics: Add the remaining tablespoon of butter to the pot. Add the minced garlic, chopped onion, and celery, then saute for 3 to 4 minutes until softened.
- Bloom the spices: Stir in the oregano, coriander, and cumin. Saute for 1 to 2 minutes to release the oils, then press the “cancel/off” button.
- Deglaze the pot: Pour in ½ cup of water. Use a wooden spoon to scrape all the browned bits (fond) from the bottom of the pot to prevent a “burn” message and add flavor.
- Pressure cook: Add the remaining water, chicken stock, browned chicken, green chiles, and prepared beans. Seal the lid and set to “manual” or “pressure cook” on HIGH for 15 minutes.
- Release pressure: Once the timer ends, press “cancel/off” and let the pot sit for 10 minutes. Switch the valve to the venting position to release the remaining steam and open the lid.
- Shred the chicken: Remove the chicken breasts or thighs to a plate and shred them using two forks.
- Thicken the soup: Whisk the cornstarch into the half and half until smooth. Stir this mixture into the chili; you may use the “saute” setting for a few minutes to thicken the consistency.
- Final assembly: Stir the shredded chicken back into the pot. If using corn, add it now. Season with the final ½ teaspoon of salt and ¼ teaspoon of black pepper before serving.
Pressure Cooking Mastery
Preventing the Burn Message
The “burn” notice usually occurs when food particles stick to the bottom of the stainless steel inner pot. Thoroughly scraping the bottom during the deglazing step with ½ cup of water is essential. Ensure no large pieces of onion or garlic remain stuck before adding the rest of the liquids.
Managing Pressure Release
Using a natural pressure release for the beans is critical to prevent them from bursting. For the main chili, a 10-minute natural release allows the chicken to stay tender. Rapidly venting the steam immediately can sometimes cause liquid to spray from the valve.
Optimizing Searing Temperature
Wait for the “saute” function to reach the “HOT” setting before adding oil and butter. If the chicken is added to a lukewarm pot, it will steam rather than brown. Browning the meat creates a Maillard reaction, which significantly deepens the overall flavor of the soup.
Ingredient Alternatives
Swapping Dairy Types
For a richer consistency, replace the half and half with heavy cream or evaporated milk. If you prefer a lighter version, use whole milk, though you may need to increase the cornstarch by a teaspoon to maintain the thickness. These alternatives provide different levels of creaminess and fat content.
Alternative White Bean Varieties
Great Northern beans are standard, but Cannellini beans offer a creamier texture. Navy beans are a smaller alternative that hold their shape well during pressure cooking. If using canned beans, always rinse them thoroughly to remove excess sodium and canning starches.
Using Chicken Thighs vs Breasts
Chicken thighs are more forgiving and remain juicy even if slightly overcooked. Chicken breasts provide a leaner protein option but can become dry if cooked too long. Both work well, but thighs generally offer a deeper flavor profile for stews and chilis.
Replacing Fresh Celery
If celery is unavailable, you can use a small amount of finely diced bok choy stems or increase the amount of onion. Celery provides a subtle base flavor that complements the cumin. A pinch of celery seed can also mimic the flavor if the fresh vegetable is missing.
Customizing the Flavor
Increasing Heat Levels
To make the chili spicier, add diced jalapeños or serrano peppers during the saute step. You can also stir in a pinch of cayenne pepper or crushed red pepper flakes. For a smoky heat, add a teaspoon of chipotle powder to the spice mix.
Adding Fresh Herbs
Stir in fresh cilantro or chopped parsley immediately before serving. Fresh herbs add a bright, citrusy contrast to the heavy cream and earthy cumin. Avoid adding fresh herbs during the pressure cooking phase as they will lose their color and flavor.
Enhancing the Umami
A small splash of soy sauce or a teaspoon of Worcestershire sauce can deepen the savory notes. These ingredients add glutamates that make the chicken stock taste more complex. Add these during the deglazing phase for the best integration.
Incorporating Acid
A squeeze of fresh lime juice stirred in at the end brightens the heavy flavors. The acidity cuts through the richness of the half and half and butter. This is especially helpful if the chili tastes too “flat” or heavy.
Serving and Presentation
Ideal Garnishes
Top each bowl with a dollop of sour cream or Greek yogurt for added tang. Sliced avocado adds a creamy texture that pairs well with the green chiles. Freshly sliced green onions or shredded Monterey Jack cheese are also excellent additions.
Side Dish Pairings
Serve this chili with warm corn tortillas or toasted tortilla chips for dipping. A side of honey-glazed cornbread provides a sweet contrast to the savory spices. A simple green salad with a lime vinaigrette helps balance the meal.
Serving Containers
For a creative presentation, serve the chili inside a hollowed-out sourdough bread bowl. This makes the meal more filling and minimizes cleanup. Alternatively, use wide, shallow bowls to allow the toppings to be spread across the surface.
Storage and Preservation
Refrigeration Guidelines
Store leftovers in airtight glass or BPA-free plastic containers once the chili has cooled to room temperature. The chili will remain fresh in the refrigerator for up to 3 to 4 days. Keep the containers sealed tightly to prevent the soup from absorbing other fridge odors.
Freezer-Friendly Methods
The base of the chili can be frozen, but the dairy component may separate upon thawing. For the best results, freeze the chili before adding the half and half and cornstarch. Store in freezer-safe bags or containers for up to 3 months.
Proper Thawing
Thaw frozen chili slowly in the refrigerator overnight before reheating. Avoid thawing in the microwave on high heat, as this can cause the beans to break down. Once thawed, you can stir in the cream and cornstarch slurry to finish the dish.
Reheating Guidelines
Stovetop Reheating
Reheat the chili in a pot over medium-low heat, stirring frequently to prevent sticking. Add a tablespoon of chicken broth or water if the soup has thickened too much in the fridge. Simmer gently until heated through to avoid boiling the dairy.
Microwave Method
Place the chili in a microwave-safe bowl and cover it with a lid or paper towel. Heat in 1-minute intervals, stirring in between to ensure even heat distribution. This prevents hot spots and ensures the dairy does not curdle.
Adjusting Consistency
If the chili becomes too thick after refrigeration, whisk in a small amount of warm stock. If it is too thin, you can simmer it on the stove for a few minutes without the lid. This allows excess moisture to evaporate, concentrating the flavors.
Advanced Prep Strategies
Batch Cooking Beans
Cook a large batch of dried beans in the Instant Pot and freeze them in one-cup portions. This eliminates the first step of the recipe when you are ready to make the chili. Pre-cooked beans save approximately 45 minutes of total preparation time.
Pre-Prepping Aromatics
Dice the onion, celery, and garlic several days in advance and store them together in a container. This “mirepoix” base can be kept in the refrigerator for up to 3 days. When ready to cook, simply scoop the prepped vegetables into the pot.
Component Storage
Prepare the cornstarch and half and half mixture in a small jar and keep it chilled. This allows you to quickly stir in the thickening agent at the end of the process. Ensure the slurry is whisked again just before adding to the hot chili.
Cooking Troubleshooting
Fixing Thin Consistency
If the chili is too thin after adding the cream, simmer it on the “saute” setting for 5 to 10 minutes. Alternatively, mash a small portion of the white beans against the side of the pot. The released starches from the beans act as a natural thickener.
Correcting Over-Salted Soup
If the chili is too salty, add a peeled potato cut into large chunks and simmer for 10 minutes. The potato absorbs some of the excess salt before being removed. You can also add an extra splash of water or unsalted stock to dilute the saltiness.
Resolving Lumpy Slurry
If the cornstarch slurry forms lumps, pass the mixture through a fine-mesh strainer before adding it to the pot. You can also use a handheld immersion blender to smooth the soup. Be careful not to over-blend, or you will turn the beans into a puree.
Frequently Asked Questions
Can I use frozen chicken?
Yes, you can use frozen chicken, but you must skip the browning step. Increase the pressure cooking time by 5 minutes to ensure the meat is fully cooked and tender. Ensure the chicken pieces are not frozen together in one large block.
Is the corn mandatory?
The corn is optional and primarily adds a touch of sweetness and visual contrast. You can omit it entirely without affecting the structural integrity or the core flavor of the chili. Some prefer the soup without corn for a more traditional white chili taste.
Can this be made in a slow cooker?
Yes, but you will need to adjust the timing significantly. Brown the chicken and saute the vegetables in a skillet first, then combine everything in the slow cooker. Cook on low for 6 to 8 hours or on high for 3 to 4 hours.
Print
Creamy Instant Pot White Chicken Chili
- Total Time: 55 minutes
- Yield: 5 servings 1x
- Diet: General
Description
Creamy and hearty soup with chicken, white beans and chile peppers.
Ingredients
- 1 cup dried great Northern beans or 2 cups of canned beans, rinsed
- 1 tablespoon olive oil
- 2 tablespoon unsalted butter, divided
- 1 ½ lbs chicken breast or thighs
- 1 teaspoon salt
- ½ teaspoon black pepper
- 3 garlic cloves, minced
- 1 small yellow onion
- 2 celery stalks, chopped
- 2 teaspoons ground cumin
- ½ teaspoon dried oregano
- ½ teaspoon ground coriander
- 2 cups water
- 2 cups low-sodium chicken stock
- 2 cans green chiles (4 ounces each)
- 1 cup half and half
- 1 tablespoon cornstarch
- 1 cup whole kernel corn (optional)
- ½ teaspoon salt
- ¼ teaspoon black pepper
- 5 cups water (for dried beans)
- 1 teaspoon salt (for dried beans)
- 1 tablespoon apple cider vinegar (for dried beans)
Instructions
- Step: If using dried beans, place beans in the Instant Pot with 5 cups of water, 1 teaspoon of salt, and 1 tablespoon of apple cider vinegar. Set to high pressure for 35 minutes (or 25 if soaked). Let pressure release naturally, then drain and set aside.
- Step: Press the sauté setting. Add one tablespoon of oil and one tablespoon of butter.
- Step: Season chicken with salt and pepper and brown on both sides; remove to a plate.
- Step: Add remaining butter, then sauté garlic, onion, and celery for 3 to 4 minutes.
- Step: Stir in oregano, coriander, and cumin and sauté for 1 to 2 minutes, then press cancel.
- Step: Deglaze the pot with 1/2 cup of water, scraping all cooked bits from the bottom.
- Step: Add remaining water, chicken stock, chicken, green chiles, and beans.
- Step: Secure the lid, set the valve to sealing, and pressure cook on HIGH for 15 minutes.
- Step: Press cancel and wait 10 minutes before venting the remaining pressure.
- Step: Remove the chicken and shred with two forks.
- Step: Mix cornstarch with half and half and stir into the chili.
- Step: Stir the shredded chicken and optional corn back into the soup.
- Step: Season with additional salt and pepper before serving.
Notes
If using canned beans, drain and rinse them and add them along with the chicken before pressure cooking. You can substitute half and half with evaporated milk or heavy cream for a creamier texture.
- Prep Time: 5 minutes
- Cook Time: 15 minutes
- Category: Soup
- Method: Pressure Cooking
- Cuisine: American
Nutrition
- Serving Size: 1 serving
- Calories: 469 kcal
- Sugar: 2 g
- Sodium: 979 mg
- Fat: 18 g
- Saturated Fat: 8 g
- Unsaturated Fat: 10 g
- Trans Fat: 0 g
- Carbohydrates: 35 g
- Fiber: 8 g
- Protein: 42 g
- Cholesterol: 117 mg