
This recipe transforms a budget-friendly cut of beef into tender, flavor-packed tacos using a low-and-slow cooking method. It is an ideal meal for hosting large groups or preparing a hearty family dinner with minimal active effort.
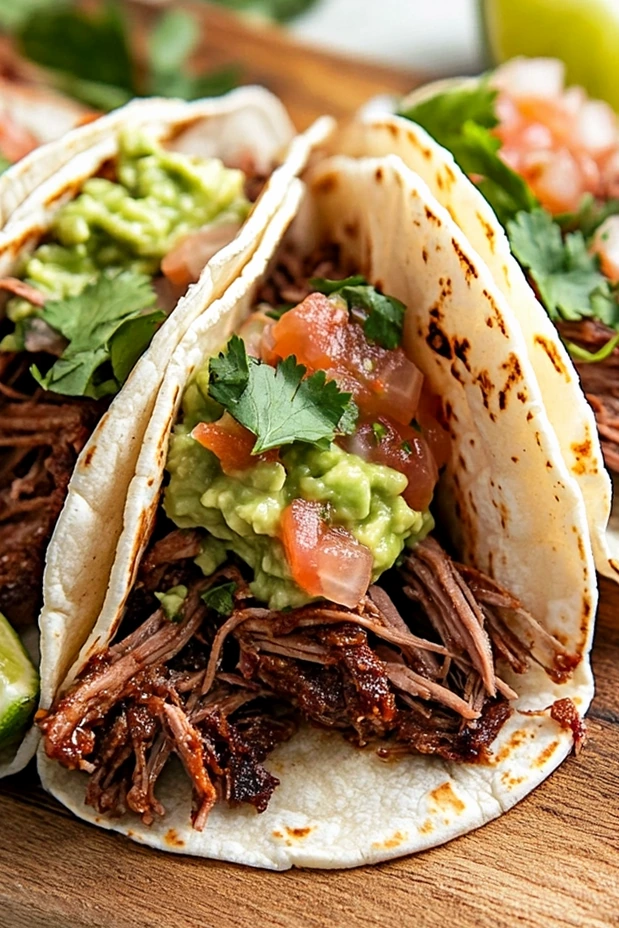
List of ingredients
- 4 pounds boneless beef chuck roast – a well-marbled cut for maximum tenderness.
- 4 tbsp taco seasoning – use a blend containing cumin and chili powder.
- Kosher salt and freshly cracked black pepper – for base seasoning.
- 2 onions, quartered – provides aromatic depth to the braising liquid.
- 1/2 cup orange juice – adds a subtle citrus acidity to tenderize the meat.
- 1/2 cup beef stock – ensures the roast stays moist during long cooking.
- Small flour tortillas – warmed or charred for assembly.
- 1 recipe guacamole – for a creamy topping.
- Your favorite salsa – for added heat and freshness.
step-by-step instructions
- Preheat and Season: Preheat your oven to 325°F (163°C). Generously season the chuck roast on both sides with salt, pepper, and taco seasoning.
- Cook the Roast: Place the seasoned roast into a Dutch oven. Add the orange juice, beef stock, and quartered onions. Secure the lid and transfer the pot to the oven. Let it bake for 3.5 to 4 hours, or until the meat is tender and easily shreds with a fork.
- Shred the Meat: After 3.5 to 4 hours, remove the roast from the oven and shred it into large chunks using two forks. If the meat isn’t falling apart yet, return it to the oven with the lid on for an additional 30 minutes.
- Crisp the Meat: Increase the oven temperature to 425°F (218°C). Toss the shredded meat with the onions and a bit more taco seasoning on a baking sheet. Place the sheet in the oven, uncovered, for 15-25 minutes until some parts of the meat begin to caramelize and crisp up.
- Prepare the Tacos: While the meat is crisping, make the guacamole. Char the tortillas over an open flame for added flavor. Assemble your tacos by spreading a dollop of guacamole on each tortilla, adding a generous spoonful of the shredded meat, and finishing with your favorite salsa or taco toppings.
Beef Selection and Preparation
Choose Well-Marbled Chuck Roast
Look for a chuck roast with significant white streaks of intramuscular fat. This marbling melts during the slow-cooking process, basting the meat from the inside and preventing it from drying out. A lean cut will result in a tougher, drier taco filling.
Trim Excessive Exterior Fat
While internal marbling is essential, remove any overly thick layers of hard white fat from the outside of the roast. This prevents the braising liquid from becoming overly greasy. Trim only the thickest portions to maintain enough fat for flavor.
Apply Seasoning Thoroughly
Press the taco seasoning and salt firmly into the meat on all sides. This ensures the flavor penetrates the exterior layers of the beef rather than just sitting on top. Seasoning before the slow-cook helps the salt break down the muscle fibers more effectively.
Mastering the Braising Process
Maintain Consistent Oven Temperature
Avoid opening the Dutch oven lid frequently during the 4-hour cooking window. Every time the lid is lifted, steam and heat escape, which can increase the total cooking time. Keep the oven door closed to ensure a steady environment for the beef.
The Role of Acidic Braising Liquids
The orange juice provides a mild citric acid that works alongside the slow heat to break down connective tissues. This acidity helps transform the tough collagen of the chuck roast into gelatin. This is what creates the characteristic fall-apart texture.
Testing for Fork Tenderness
Before removing the roast, insert a fork and twist gently. The meat should slide apart with almost zero resistance. If the meat feels springy or resists shredding, it requires more time in the liquid to fully break down.
Secrets for Perfect Meat Crisping
Arrange Beef in a Single Layer
When transferring the shredded beef to the baking sheet, spread it out as much as possible. Overcrowding the pan causes the meat to steam rather than sear. A single layer ensures that maximum surface area is exposed to the high heat.
Utilize the Maillard Reaction
Increasing the oven temperature to 425°F triggers the Maillard reaction, where proteins and sugars brown. This creates the crispy, caramelized edges that provide a textural contrast to the tender interior. Keep the meat uncovered to allow moisture to evaporate quickly.
Monitor Browning Closely
Check the baking sheet every 5 to 10 minutes during the final crisping stage. Because the meat is shredded and thin, it can go from caramelized to burnt very quickly. Rotate the pan halfway through to ensure even browning across the entire sheet.
Serving and Assembly Ideas
Flame-Charring the Tortillas
Place flour tortillas directly over a low gas flame for 5-10 seconds per side using tongs. This creates small charred spots and a smoky aroma that complements the roasted beef. If you do not have a gas stove, use a dry cast-iron skillet over medium-high heat.
Layering Toppings for Stability
Spread the guacamole on the bottom of the tortilla first to act as a moisture barrier. This prevents the juices from the meat from soaking through the tortilla too quickly. Place the beef on top of the guacamole to keep the taco structurally sound.
Selecting the Right Salsa
A salsa verde provides a bright, tangy contrast to the rich, fatty beef. Alternatively, a smoky chipotle salsa enhances the charred flavors of the crisped meat. Choose a salsa with a consistency that isn’t too watery to avoid soggy tacos.
Customizations and Variations
Using Corn Tortillas
For a gluten-free version, substitute the flour tortillas with corn tortillas. To prevent corn tortillas from cracking, dip them lightly in warm oil or steam them in a damp towel before assembly. This makes them pliable enough to hold the heavy beef filling.
Adding Spicy Elements
Incorporate diced fresh jalapeños or a pinch of chipotle powder into the beef before the final crisping step. This integrates the heat directly into the meat. You can also add pickled habaneros as a topping for a more intense spice profile.
Converting to Taco Bowls
Serve the shredded, crisped beef over a bed of cilantro-lime rice or quinoa. Arrange the guacamole, salsa, and corn salad in sections around the meat. This is a great option for those preferring a heartier, more filling meal over handheld tacos.
Storage and Reheating Guide
Refrigerating Shredded Beef
Store the cooked beef in an airtight container in the refrigerator for up to four days. Keep the remaining braising liquid in a separate container to use during reheating. This helps the meat retain its moisture during the second warming.
Freezing for Long-Term Use
Freeze the shredded beef in vacuum-sealed bags or freezer-safe containers for up to two months. Ensure the meat is completely cooled before freezing to prevent ice crystals from forming. Label the bags with the date for freshness tracking.
Reheating without Drying
Warm the beef in a skillet over medium heat with a splash of beef stock or the original braising liquid. This rehydrates the meat fibers and restores the juicy texture. Avoid using a microwave on high power, as this can make the beef rubbery.
Common Troubleshooting
Dealing with Tough Meat
If the meat is not shredding easily after four hours, return it to the oven for another 30 to 60 minutes. Toughness is usually a sign that the collagen has not fully melted into gelatin. Adding a small amount of extra beef stock can help if the liquid has evaporated.
Correcting Too Much Liquid
If the beef is swimming in too much liquid after the slow-cook, simmer the juices in a saucepan until reduced by half. This concentrates the flavor and creates a thick glaze. Toss the shredded beef in this reduction before the final crisping step.
Preventing Burnt Edges
If the beef browns too quickly during the crisping stage, lower the oven temperature to 400°F. You can also lightly spray the baking sheet with oil to prevent the meat from sticking and burning in one spot. Watch for a deep golden brown rather than black edges.
Frequently Asked Questions
Can I make this in a slow cooker?
Yes, you can transfer all ingredients to a slow cooker and cook on low for 8 to 10 hours. Ensure the roast is fully submerged in the liquids. You must still perform the final oven-crisping step on a baking sheet to achieve the correct texture.
What is the best beef cut for this recipe?
Chuck roast is the superior choice because it contains a balance of fat and connective tissue. Other cuts like rump roast can be used, but they are leaner and may require more braising liquid to stay moist.
Do I have to crisp the meat?
While the meat is delicious straight from the Dutch oven, crisping it adds a necessary layer of flavor and texture. The caramelization creates a savory crust that balances the softness of the shredded beef and the creaminess of the guacamole.
Can I use a different juice instead of orange?
Lime juice mixed with a teaspoon of honey or maple syrup is a great alternative. The goal is to provide acidity to tenderize the meat and a hint of sweetness to balance the savory taco spices.
How do I prevent the tortillas from breaking?
Always warm your tortillas before serving. For corn tortillas, a quick fry in a pan with a bit of oil or a steam in a tortilla warmer makes them flexible. For flour tortillas, a few seconds over an open flame is sufficient.
Print
Slow-Cooked Chuck Roast Tacos
- Total Time: 4 hours 10 minutes
- Yield: 7 servings 1x
- Diet: General
Description
Chuck roast is a wonderfully flavorful and budget-friendly cut of beef that’s perfect for feeding a crowd. It’s at its best when cooked low and slow, making it ideal for these Chuck Roast Tacos. The result? Tender, fall-apart meat that’s incredibly easy to prepare and even easier to enjoy.
Ingredients
- 4 pounds boneless beef chuck roast
- 4 tbsp taco seasoning
- Kosher salt and freshly cracked black pepper
- 2 onions, quartered
- ½ cup orange juice
- ½ cup beef stock
- Small flour tortillas
- 1 recipe guacamole
- Your favorite salsa
Instructions
- Preheat and Season: Preheat your oven to 325°F (163°C). Generously season the chuck roast on both sides with salt, pepper, and taco seasoning.
- Cook the Roast: Place the seasoned roast into a Dutch oven. Add the orange juice, beef stock, and quartered onions. Secure the lid and transfer the pot to the oven. Let it bake for 3.5 to 4 hours, or until the meat is tender and easily shreds with a fork.
- Shred the Meat: After 3.5 to 4 hours, remove the roast from the oven and shred it into large chunks using two forks. If the meat isn’t falling apart yet, return it to the oven with the lid on for an additional 30 minutes.
- Crisp the Meat: Increase the oven temperature to 425°F (218°C). Toss the shredded meat with the onions and a bit more taco seasoning on a baking sheet. Place the sheet in the oven, uncovered, for 15-25 minutes until some parts of the meat begin to caramelize and crisp up.
- Prepare the Tacos: While the meat is crisping, make the guacamole. Char the tortillas over an open flame for added flavor. Assemble your tacos by spreading a dollop of guacamole on each tortilla, adding a generous spoonful of the shredded meat, and finishing with your favorite salsa or taco toppings.
Notes
Season Generously: Don’t be shy with the seasoning; it’s key to the deep, rich flavor of these tacos. Tender Meat: The longer, low-temperature cooking ensures the chuck roast becomes melt-in-your-mouth tender. Caramelization Tip: Keep an eye on the meat while it’s in the oven at 425°F to prevent it from burning.
- Prep Time: 10 minutes
- Cook Time: 4 hours
- Category: Main Course
- Method: Slow Cooking
- Cuisine: Tex-Mex
Nutrition
- Serving Size: 1 serving
- Calories: 340 kcal
- Sugar: 3 g
- Sodium: 152 mg
- Fat: 20 g
- Saturated Fat: 8 g
- Unsaturated Fat: 12 g
- Trans Fat: 0 g
- Carbohydrates: 5 g
- Fiber: 1 g
- Protein: 34 g
- Cholesterol: 125 mg